Welcome to our blog post Friend on How to Set Up and Activate iMessage on iOS? and Friends, Learn about the iOS system requirements needed to activate iMessage on your device. Find out if your iOS version supports iMessage activation today. Step-by-step guide on creating an Apple ID specifically for iMessage activation. Start messaging with friends and family on iOS today!
Friend, Easily activate iMessage on your iPhone with our comprehensive guide. Start enjoying instant messaging with other iOS users hassle-free.
Discover solutions to common issues preventing iMessage activation on your iOS device. Resolve activation problems quickly and efficiently.
Friend, Learn how to customize and adjust iMessage settings on iOS 14 for a personalized messaging experience. Discover all the features available at your fingertips.
Troubleshoot the “iMessage Waiting for Activation” error on iOS devices. Ensure your network settings are correctly configured for seamless activation. Explore the security benefits of iMessage encryption and how it protects your conversations. Keep your messages safe and private on iOS.

How to Set Up and Activate iMessage on iOS
Want to start using iMessage but don’t know where to begin? No worries, you’re in the right place! In this article, we’ll show you exactly how to set up iMessage on your iPhone. Plus, if iMessage is being a little tricky and not working right, we’ve got some tips to get it back on track.
What is iMessage?
iMessage is Apple’s special messaging service that lets you send texts, photos, videos, and more between Apple gadgets. Unlike regular SMS, iMessage uses the internet, which means you get cooler features and better security. Think of it as the VIP lounge for messages—fancier, safer, and way more fun.
Why settle for plain old SMS when you can iMessage? It’s like choosing between a flip phone and the latest iPhone—one’s a dinosaur, the other’s a tech marvel! So next time you’re texting your BFF, know that iMessage has your back with all the bells and whistles. 📱✨
Importance of iMessage
With iMessage, you can enjoy a top-notch messaging experience. It’s like having a mini-movie studio in your pocket, complete with high-quality media sharing, read receipts, and typing indicators. Plus, everything is end-to-end encrypted, so your secrets are safe (even from nosy siblings). iMessage also plays nice with other Apple services, making it a breeze to stay connected. It’s not just texting; it’s texting with a touch of magic.
High-Quality Media Sharing
With iMessage, sharing photos, videos, and even GIFs is a delight. The media quality is top-notch, making your shared memories look as crisp and clear as if they were right in front of you.
Read Receipts and Typing Indicators
Wondering if your friend read your message? iMessage has you covered with read receipts. Plus, those little typing bubbles let you know when someone is replying, so you’re not left hanging.
End-to-End Encryption
Your conversations are for your eyes only, thanks to iMessage’s end-to-end encryption. It’s like having a super-secret chat room where only you and your friends are invited.
Seamless Integration with Apple Services
iMessage isn’t just a standalone app; it integrates smoothly with other Apple services. Whether you’re using Siri, sending an Apple Pay payment, or sharing your location, iMessage makes it all simple and seamless.
In a nutshell, iMessage makes texting feel less like a chore and more like a fun, interactive experience. It’s the Ferrari of messaging apps—fast, sleek, and packed with features.
Overview of the Setup Process
Getting iMessage up and running is usually a breeze, but there can be a few bumps in the road (don’t worry, we’ll help you navigate those pesky potholes!). It’s all about flipping a switch (or two) on your iPhone, then verifying your phone number or Apple ID (think of it like a secret handshake). Finally, you can tweak the settings to your liking. Sound easy? It is! But if things get a little wonky, don’t fret – we’ve got some troubleshooting tips to get those blue bubbles popping in no time!
iMessage Compatibility
Alright, so iMessage isn’t exactly exclusive, but it is for the Apple fam. That means you can use it on your iPhone, iPad, iPod Touch, and even your Mac. Think of it as a giant Apple clubhouse chatroom! But before you jump in, there are a couple of things to keep in mind.
First, your device needs to be running iOS 5 or later. If you’re rocking an iPhone from the flip phone era, you might be out of luck (but hey, at least you can play Snake!). For the best experience, we recommend updating your device to the latest version of iOS – think of it as getting the VIP pass to the iMessage party. Updating is super easy, just head over to your settings and check for software updates. Let’s get you chatting with those blue bubbles!
Preparing for iMessage Setup
Before we dive into iMessage activation, let’s make sure your iPhone isn’t rocking an operating system from the Stone Age (no offense to fans of classic ringtones!). Here’s the deal: head over to Settings > General > Software Update. It’s like checking the hood of your car before a road trip – just a quick peek to see if everything is running smoothly. If an update is available, go ahead and download it – think of it as getting the latest features and bug fixes for your iMessage experience.
Also, nobody likes losing precious texts or photos during a tech adventure. So, just to be safe, let’s back up your device using iCloud or iTunes. It’s like having an insurance policy for your digital life. Once that’s done, we can officially welcome you to the iMessage cool kids’ club!
Read Also:
- How to Hide Apps on iPhone in 2024?
- How to Locate AirTag on iPhone 2024
- How to reduce your screen time by Hiding Apps?
- Which is the Top 5 Best Free Photo Editing Apps for iOS 2024
Setting Up iMessage on iPhone
1. Open up the settings on your device.
Alrighty, let’s get this iMessage party started! First things first, we need to find the control center. It’s like the mission control for your iPhone, and guess what? That’s where the iMessage activation switch lives. Look for the Settings icon on your home screen – it usually looks like a little gray gear. Tap that bad boy, and we’ll be one step closer to those fancy blue message bubbles!

2. Scroll down and tap Messages.
Now that you’re in the Settings jungle, we gotta find the right path. Scroll down a bit until you see an icon that looks like a little speech bubble – that’s Messages. Tap on that, and we’ll be knee-deep in iMessage activation in no time! Think of it like finding the hidden doorway to the exclusive blue bubble club.
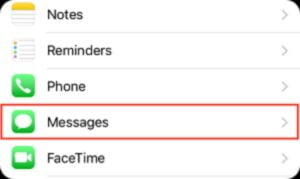
3. At the top of the next screen, move the toggle over to the right to activate iMessage.
Alright, we’re almost there! Look at the top of your screen – you should see a toggle switch next to “iMessage”. This is like the magic on/off button for the whole thing. Just flick that switch to the right (we’re going green for iMessage, baby!). Once it turns green, you’re officially in the iMessage game. High-fives all around!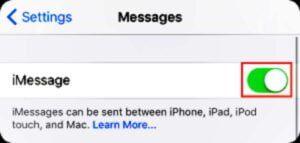
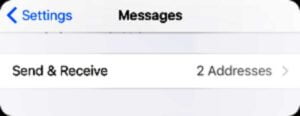
4. Choose the addresses you’d like to use to send and receive messages.
Congrats, you’ve unlocked the power of iMessage! But before you start blasting fancy messages everywhere, let’s pick your player one. Tap on “Send & Receive”. This is basically your iMessage guest list – you can choose which phone number or email address you want to use for sending and receiving messages. Think of it like picking your superhero alias – do you want to be known as “iMessageMeAt5555” or “BatText8675309”? The choice is yours!
5. Customize your other iMessage settings to your personal preferences.
Didn’t we just become iMessage besties? But hold on to your hats, because there’s even more to explore! Scroll down a bit after activating iMessage, and you’ll stumble upon a secret menu of settings.
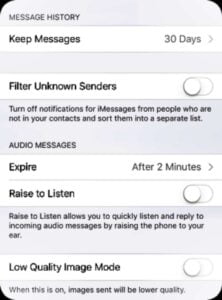
Think of it like your personalized iMessage playground. Here you can choose things like how long to keep old messages (nobody needs a digital museum of awkward texts, right?), or enable those pesky “read receipts” (so your friends can see exactly when you’re, ahem, contemplating a reply).
These settings can even help you be a data whiz or a privacy pro – we’ve got entire articles dedicated to those topics if you’re feeling extra curious!
One setting to keep an eye on is “Read Receipts”. Basically, it tells people if you’ve seen their message. Think of it like a digital thumbs up. Slide the switch to the right if you want to enable it, or leave it off to be a master of message mystery.
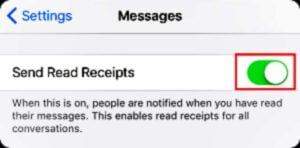
But wait, there’s more! There are other iMessage tweaks hiding outside of this settings menu. Next up, we’ll show you how to turn off those pesky message previews in your notifications – no more accidentally revealing your friend’s top-secret text in public!
To disable message preview
1. Tap Settings on the home screen of your iPhone.
Alrighty, iMessage newbies! Let’s navigate the iPhone settings jungle and find the secret lair of iMessage activation. First things first, find the Settings icon on your home screen – it’s usually a little gray gear that looks like it means business. Tap that bad boy, and we’ll be one step closer to unlocking the world of fancy blue bubbles and disappearing thumbs-up emojis!

2. Scroll down the settings menu, and tap Notifications.
Now that you’re in the iPhone settings, it’s time to find the notification control center. This is where you tell your phone what kind of alerts you want to see (and maybe avoid in public!). Scroll down a bit until you see “Notifications”. Tap on that, and we’re on the fast track to iMessage notification mastery!
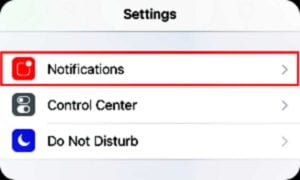
3. On the next page, select Messages.
We’re getting close, iMessage recruits! Inside the notification control center, you’ll see a whole list of apps. Look for “Messages” – that’s our ticket to blue bubble notification bliss. Tap on that, and we’ll be customizing those alerts in no time! Imagine never missing a hilarious meme or important text again (because, let’s be honest, those are the only two types of texts that truly matter).
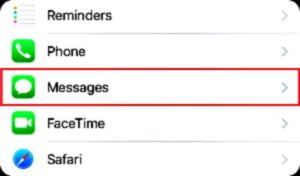
4. Scroll to the bottom of the page and tap Show Previews.
Almost there, iMessage champions! Scroll down to the very bottom of this menu – that’s where the secret notification treasure lies. Look for a setting called “Show Previews”. This basically controls what juicy message bits appear on your lock screen (because who wants to unlock their phone for every single text, right?). Tap on that, and we’ll be customizing those previews in a flash! Just be warned, enabling previews might accidentally reveal your friend’s grandma text about that embarrassing childhood story…oops!
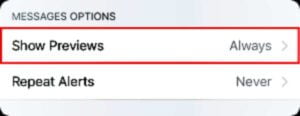
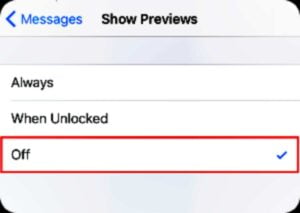
5. Finally, select Off to disable the function.
Alright, here’s the final step to notification nirvana! Underneath “Show Previews” you’ll see three choices: “Always,” “When Unlocked,” and our secret weapon – “Off”. Selecting “Off” is like throwing a cloak of secrecy over your messages. No more accidentally revealing your friend’s latest emoji rant on your lock screen for the whole world to see (been there, done that!). Tap “Off,” and those message previews are history – mystery and suspense reign supreme! Now you can hold your head high knowing your text messages are safe from prying eyes. Congrats, you’ve officially mastered your iMessage notifications!
Woot woot! You’re officially an iMessage pro – say goodbye to green bubbles and hello to a world of fancy messaging features! But hold on a sec, sometimes even the best tech adventures hit a snag. Don’t worry, troubleshooting gremlins are no match for us. We’ve got a whole list of common iMessage hiccups and how to fix them – so keep your cool and keep reading! We’ll have you chatting in blue bubbles again in no time!
Reasons iMessage might not be working
1. You need to fix your Internet connection.
Alright, iMessage pro, let’s talk troubleshooting. Even the coolest tech can run into a bump in the road sometimes (don’t worry, it happens to the best of us). If you’re sending messages and nothing’s happening while connected to Wi-Fi, the culprit might not be your phone – it could be your Wi-Fi itself acting wonky! Try disconnecting from Wi-Fi and see if your messages fly through using cellular data. Think of it like giving your Wi-Fi a little time out.
But if you gotta stick to Wi-Fi, make sure you typed the password in flawlessly (those sneaky little typos can really mess things up!). Still no luck? Sometimes a simple router reboot does the trick. It’s like giving your Wi-Fi a good talking to and reminding it to get back to work! We’ll get you back to those blue bubbles in no time. Keep reading!
2. You need to re-boot your device.
Tech glitches can be like tiny gremlins messing with your phone sometimes (don’t worry, they’re more annoying than harmful!). But fear not, iMessage hero! Sometimes the cure for a grumpy app is a simple restart. Yep, just turn your phone completely off and on again. It’s like giving your iPhone a little nap to clear its head and come back refreshed. Try that and see if your iMessage woes magically disappear! If not, don’t fret – we’ve got more troubleshooting tricks up our sleeves. Keep reading!
3. You need to update your device’s operating system.
Still having iMessage blues? Let’s play tech detective and get to the bottom of this! Sometimes, the issue might be as simple as a dusty old phone needing a refresh. Head over to Settings > General > Software Update. Think of it like checking under the hood of your car – is your phone’s operating system due for an upgrade? If there’s a new version available, download it! It’s like giving your iPhone the latest tools and tricks to run smoothly. Once it’s updated, fire up iMessage again and see if those blue bubbles are back in business! We’re almost there!
4. You need to sign in to your Apple ID
Still having iMessage blues? Let’s crank up the troubleshooting dial to eleven! Sometimes this whole iMessage thing might be a case of mistaken identity. iMessage uses your Apple ID to send and receive messages, so you gotta be signed in for it to work its magic. Imagine it like showing your ID card at a fancy blue bubble club – gotta prove you belong! Head over to Settings > iCloud. Check and see if you’re properly logged into your Apple ID account. If not, sign in quick, and those blue bubbles should be flooding your inbox in no time! We’re almost there, iMessage master!
5. You need to reset your network settings.
Ever feel like your iPhone is giving you the silent treatment? Sometimes, it’s just the network settings acting up. No need to panic! You can easily reset them by heading to Settings > General > Reset > Reset Network Settings. It’s like giving your phone a fresh start, kind of like when you finally find that missing sock in the laundry. Give it a try and see if your connection issues vanish.
6. You have to disable Portrait Orientation Lock.
Ever wondered why some of iMessage’s cool features aren’t working? It might be because your phone is stuck in Portrait Orientation Lock. To fix this, you need to flip to landscape mode. Don’t worry, it’s easy! Just swipe up from the bottom of your screen to open the control panel. Look for the button in the top right corner – that’s your Portrait Orientation Lock control. If it’s red, it means it’s on; if it’s gray, it’s off. Tap it once to switch it up.
Think of it as unlocking your phone’s superpowers. Now you can enjoy all those awesome iMessage features! Who knew a little button could make such a big difference?
7. Your device may have a hardware issue.
Tried everything and still no luck? It might be a deeper issue with your device’s hardware. Don’t throw in the towel just yet! Sometimes, even our beloved gadgets need a professional touch. We recommend visiting an Apple Genius Bar or giving Apple Support a call.
Think of it like bringing your car to a mechanic – sometimes, you just need an expert to take a look under the hood. Who knows? Maybe they’ll find something you missed. At the very least, you’ll be in good hands!
Conclusion
So friends, today in this article you have learned that activating iMessage on your iOS device is a simple process that can greatly improve your communication experience. Friends, by following the steps mentioned in this guide, you can quickly set up iMessage and start sending messages to your friends and family in no time. Enjoy the convenience and features offered by iMessage on your iOS device today. So friends, if you liked our article today, then you can also share this article with your friends, we thank you from the bottom of our hearts, have a nice day
FAQ
1. What is iMessage?
- iMessage is an instant messaging service provided by Apple that allows users to send text messages, photos, videos, and more to other Apple devices using an internet connection.
2. Is iMessage free to use?
- Yes, iMessage is free to use as long as you have an internet connection, either through Wi-Fi or cellular data.
3. How do I set up iMessage on my iOS device?
- To set up iMessage on your iOS device, go to Settings > Messages and toggle the iMessage switch to enable it. You may need to enter your Apple ID and password to activate iMessage.
4. Can I use iMessage without a phone number?
- Yes, you can use iMessage with just an email address associated with your Apple ID if you don’t want to use your phone number.
5. How can I check if iMessage is activated on my device?
- To check if iMessage is activated, go to Settings > Messages and look for the iMessage toggle switch. If it’s green, iMessage is activated.
6. Do I need a Wi-Fi connection to use iMessage?
- While iMessage works best with a Wi-Fi connection, you can also use it with cellular data if Wi-Fi is not available.
7. Can I send messages to non-Apple devices using iMessage?
- No, iMessage is exclusive to Apple devices, so you can only send messages to other Apple users who have iMessage activated.
8. How do I customize my iMessage settings?
- You can customize your iMessage settings by going to Settings > Messages and adjusting options such as message effects, read receipts, and message forwarding.
9. Can I use iMessage on multiple Apple devices?
- Yes, you can use iMessage across multiple Apple devices, such as iPhones, iPads, and Macs, as long as they are signed in with the same Apple ID.
10. What should I do if I encounter issues with iMessage activation?
- If you encounter issues with iMessage activation, try restarting your device, checking your internet connection, and ensuring that your Apple ID is correct. If the problem persists, you may need to contact Apple Support for further assistance.
