Friends, we welcome you to our new article. In this article, you are going to learn how to turn on the iPhone’s new thief-blocking security features. Due to this, when your phone is stolen, it will be automatically blocked, and you will not be able to use it. With the help of the feature, we will tell you its features thoroughly in this post, and today you are going to get very good information in this post with the help of which you can use the iPhone in a better way. Let’s start making friends.
How to turn on iPhone’s New thief-blocking security Features
Hold onto your hats, iPhone users, because Apple just dropped a security update that’s hotter than a stolen phone on a summer day! Yeah, phone thefts are getting sneakier than ninjas, but fear not; Apple’s got your back (and your precious data).
Introducing Stolen Device Protection, the update that basically turns your iPhone into a fortress fit for a king (or at least a particularly paranoid comedian). This bad boy throws up barriers like nobody’s business, making it tougher than a toddler in a toy store to crack into your phone, even if it’s been snatched miles away. ♀️
Think of it like a valet key for your iPhone. Imagine handing your car to a stranger, but instead of them getting the keys to the vault (your data), they only get the keys to the radio (harmless apps). That’s basically what Stolen Device Protection does: it limits access to the juicy stuff, leaving thieves with nothing but digital tumbleweeds. ️Turn on the iPhone’s new thief-blocking security features.
And it gets better! Say goodbye to the days of typing in your passcode like a grandma trying to unlock her flip phone. Instead, Stolen Device Protection lets you unlock apps with your face or fingerprint, because, let’s be honest, who remembers their passcode these days? (Except maybe grandma; bless her heart.)
So there you have it, folks! Apple’s new update is basically security with a side of sass. Now you can go forth and conquer the digital world, knowing your iPhone is more protected than a witness protection program participant. Just remember, even with this fancy new armor, common sense is still your best friend. Don’t leave your phone unattended in a dark alley, and maybe avoid using it as a juggling practice. ♀️
Set a passcode on iPhone
Let’s face it, your iPhone holds more secrets than a magician’s hat (hopefully not actual rabbits, though). So, why leave it unlocked like a free candy dish at a toddler’s birthday party?
Here’s where the passcode comes in—your knight in shining armor against digital pickpockets. Think of it like a bouncer for your phone, only way cooler because it lets you in with a few taps instead of awkward fist bumps. Turn on the iPhone’s new thief-blocking security features.
Setting a passcode does two amazing things:
- Locks down your phone tighter than a vault: Remember that movie scene where they crack a safe with fancy gadgets? Yeah, forget that. A strong passcode makes your phone tougher to crack than a walnut with a toothpick.
- It encrypts your data like a secret agent. Imagine your photos, messages, and contacts doing the cha-cha with a 256-bit AES encryption. That’s basically a fancy way of saying that even if someone does manage to peek into your phone, they’ll see nothing but scrambled gibberish.
Bonus perk: Setting a passcode is like hitting two birds with one stone. It protects your phone and encrypts your data, all in one fell swoop. Now that’s what I call multitasking magic!✨
Remember, the stronger your passcode, the better. Skip the obvious choices like “123456” or your birthday (unless it’s super unique, like February 30th). Get creative, mix things up, and keep your phone as secure as Fort Knox (without the alligators, hopefully). Turn on the iPhone’s new thief-blocking security features.
Set or change the passcode
Ready to turn your iPhone into a fortress fit for a superhero (or at least a privacy-conscious individual)? Buckle up, because it’s passcode time!
Here’s the drill:
- Open the Settings app. Think of it as your mission control center for phone dominance.
- Find the security squad:
- Face ID warriors: tap “Face ID & Passcode.”.
- Touch ID champions: tap “Touch ID & Passcode.”.
- Activate the passcode shield! Tap “Turn Passcode On” or “Change Passcode.”. Don’t be shy; choose a strong one. Your secrets deserve better protection than a birthday or “password123.”.
- Passcode options galore! Tap “Passcode Options” to explore your inner codebreaker. For maximum security, go alphanumeric or custom numeric. Think of it as creating your own secret language, except way cooler than piglatin.
- Face ID/Touch ID: Handy, but not foolproof. While these unlock your phone in a flash, remember:
- Phone restarts or long snoozes: Your trusty passcode will be your gateway back in.
- 48-hour phone coma: Same as above, sleepyhead!
- Passcode haven’t met in a while? Face ID or Touch ID get a timeout after 6.5 days without your passcode.
- Is the remote lock activated? Passcode to the rescue again!
- Too many failed face or fingerprint attempts? Passcode steps in like a superhero landing.
- Emergency SOS or Medical ID: A passcode is always the key.
Remember: This isn’t about making your life difficult; it’s about keeping your data safe. Think of your passcode as your phone’s bouncer, ensuring only authorized personnel (read: you!) get access. Turn on the iPhone’s new thief-blocking security features.
So, what are you waiting for? Give your iPhone the security upgrade it deserves and become the master of your mobile domain! ️✨
Change when iPhone automatically locks
Tired of your iPhone staring blankly at you like a lovesick puppy just because you paused mid-scroll? Fear not, fellow phone enthusiasts, for the Auto-Lock feature is here to save the day (and your battery)!
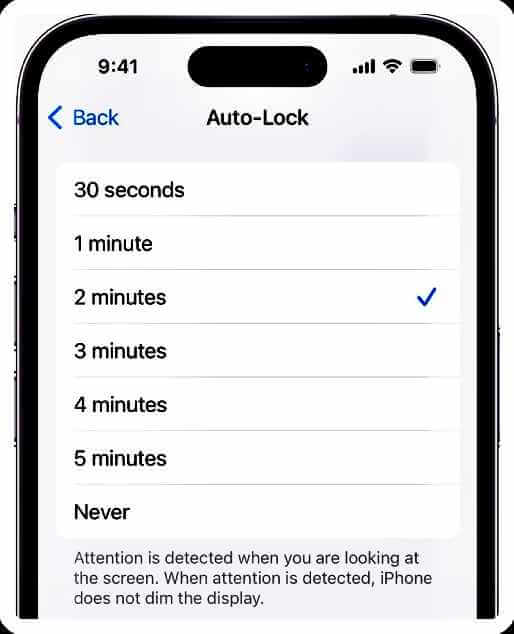
Think of it like a screensaver for grown-ups. Just head to Settings > Display & Brightness > Auto-Lock and choose your nap time. 30 seconds? An hour? The choice is yours, my friend.
But here’s the plot twist: if you leave your phone chilling on the home screen like a fashionably late celebrity, its nap time gets cut in half. Don’t worry, it’s not judging you (probably); it just wants to save some juice. Turn on the iPhone’s new thief-blocking security features.
So go forth and conquer the digital world, knowing your phone won’t become a glowing rectangle of drain just because you got lost in that cat video (we’ve all been there). Just remember, with great power (i.e., a long auto-lock time) comes great responsibility (i.e., don’t miss an important call because your phone’s asleep on the job).
Erase data after 10 failed passcodes
Ever accidentally typed your passcode wrong a million times while your phone judged you silently? Yeah, we’ve all been there. But what if, after 10 epic fails, your iPhone decided to take matters into its own hands and, well, wipe itself clean?
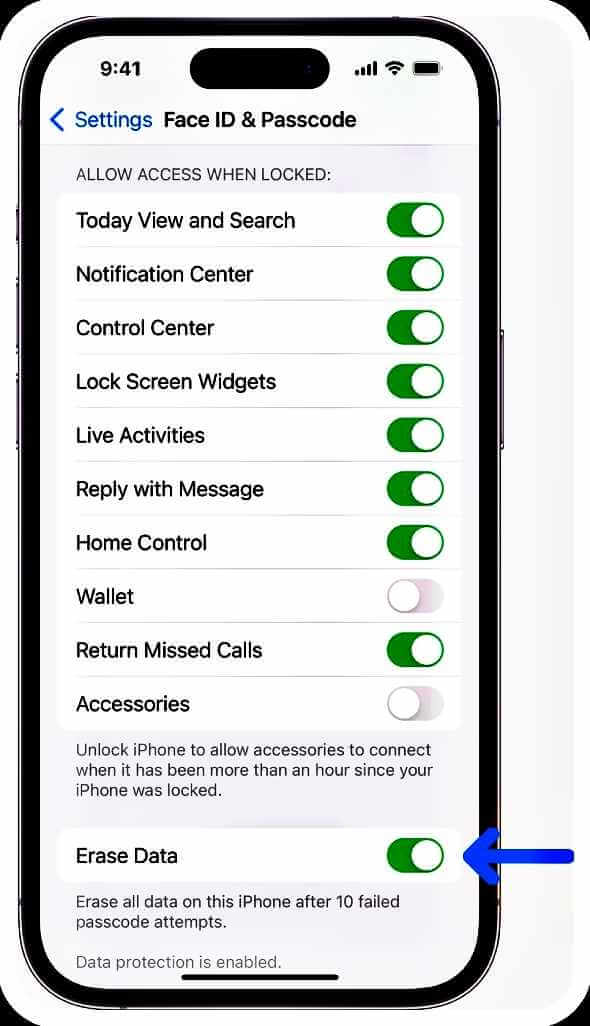
That’s where the “Erase Data” feature comes in, basically the nuclear option for forgetful phone users. Here’s how to activate this data self-destruct button:
- Dive into Settings: It’s like mission control for your phone, minus the questionable fashion choices.
- Face ID warriors: tap “Face ID & Passcode.”.
- Touch ID champions: tap “Touch ID & Passcode.”.
- Scroll down like you mean it: Find the “Erase Data” toggle and flip it on. Just remember, this is a one-way trip, so make sure you’re really ready to say goodbye to your data.
- Backups are your best friends. Unless you’re a data minimalist who thrives on chaos, backing up your phone is crucial. Think of it as having a digital parachute in case things go south.
Word to the wise: This feature is like that fire alarm with the super-sensitive smoke detector. It might seem extreme, but it can be a lifesaver if your phone falls into the wrong hands. Just remember, with great power (i.e., data security) comes great responsibility (i.e., remembering your passcode or backing up your stuff). Turn on the iPhone’s new thief-blocking security features.
Turn on and set up iPhone
So, you snagged a brand new iPhone, shiny and ready to explore the digital world. Now, how do you bring this beauty to life? Buckle up, because you have options:
1. Go wireless, be wireless: Connect to the internet like a modern marvel and follow the on-screen instructions. Think of it as your iPhone’s grand entrance, complete with virtual confetti (okay, maybe not confetti, but you get the idea).
2. Plug and play (sort of): Connect your iPhone to your computer using a cable (yes, wires still exist, surprisingly). Your computer will become your friendly guide, helping you set everything up.
3. Data transfer tango: Got an old iPhone, iPad, or even an Android device? You can use it to magically transfer your data to your new phone. It’s like a digital inheritance, passing on all your important stuff without the awkward family gathering.
Bonus round: If your iPhone belongs to your work, don’t go rogue! Ask your IT hero for specific setup instructions. They’ll have the secret decoder ring (or the equivalent) to get you started. Turn on the iPhone’s new thief-blocking security features.
Remember: No matter which path you choose, read the instructions (yes, even the boring ones). It’s the key to unlocking your iPhone’s full potential without any unnecessary drama. Now go forth and conquer the digital world with your awesome new device!
Prepare for setup
So you’ve got your shiny new iPhone, but before you unleash its full potential, there’s a quick setup party to attend. Don’t worry, it’s mostly painless, just like any good party with the right prep. Here’s what you need to be the star guest:
1. Wi-Fi: Think of it as the party’s password. Grab the network name and password before things get lit. Feeling data-savvy? Skip this for later models (except the iPhone 14 and friends; they like Wi-Fi for setup).
2. Apple ID: This is your VIP pass to the Apple world. Don’t you have one? No worries; create one at the party (like crashing and charming your way in; way cooler). Turn on the iPhone’s new thief-blocking security features.
3. Credit/Debit Card: Feeling fancy? Add a card to Apple Pay and become the cashless hero who pays with a flick of their wrist. Think of impressing your friends (or at least the barista).
4. Backup Buddy: Got an old iPhone or a device backup? Bring it along! It’s like transferring all your party decorations (photos, contacts, etc.) to the new digs.
Bonus Tip: Storage Blues? iCloud throws you a temporary storage lifeline for three weeks after purchase, just enough to back up and get the party started. No excuses!
5. Android Switcheroo?: Coming from the other side? Bring your Android device too; we’re an inclusive bunch! No Android is left behind.
Remember, these are just the essentials. The setup itself is a breeze, with everything ready. So gather your metaphorical snacks (and maybe some real ones too), crank up the tunes, and get ready to welcome your new iPhone to the party!
Turn on and set up your iPhone
So you’ve got your brand new iPhone, but before you dive into endless cat videos, there’s one small task: waking it up! Don’t worry, it’s easier than teaching a cat to use a litter box (hopefully). Turn on the iPhone’s new thief-blocking security features.
Step 1: The Power Button Shuffle
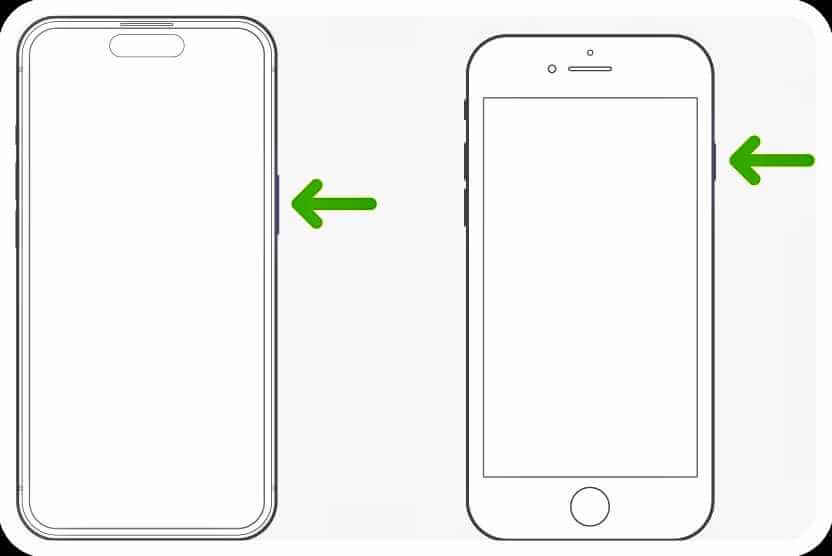
Hold down the side button; that’s the one on the right. Keep it company for a few seconds until the Apple logo makes its grand entrance. If your iPhone’s playing dead, it might just need some battery juice. Plug it in and give it a little charge before trying again. Still no luck? Check out Apple’s support article; they’re the iPhone whisperers. Turn on the iPhone’s new thief-blocking security features.
Bonus Tip: For visually impaired friends, no worries! You can activate VoiceOver, your friendly screen reader, with a triple tap of the side button. Feeling extra close? Double-tap the screen with three fingers for Zoom. Accessibility FTW!
Step 2: Choose Your Adventure
Now, the fun part! You have three paths to choose from:
1. Quick Start: Got another Apple device nearby with some recent software? Use Quick Start to copy over your settings and stuff like a magic trick. Think of it as your digital twinning session.
2. Wireless Shuffle: Are both devices rocking some recent software? Do a wireless data transfer, like two phones exchanging gossip in the schoolyard. Just keep them close and powered up until they’re done whispering secrets.
3. Manual Maestro: No other device handy? No sweat! Choose Set Up Manually and follow the on-screen instructions. It’s like building your iPhone from scratch, but way easier (and without needing tiny screwdrivers).
Remember, this is just the first step in your iPhone journey. But with these simple instructions, you’ll be up and running in no time, ready to explore the digital world with your new best friend. Now go forth and conquer! (And maybe take some cat videos while you’re at it.)
Read Also:Which is the Top 5 Best Free Photo Editing Apps for iOS 2023
Turn off the passcode
Feeling like your iPhone needs a breather from your passcode obsession? No judgment here! But before you go all “security who?” remember, with great power (unlocking your phone in a flash) comes great responsibility (keeping your data safe from prying eyes).
If you’re absolutely sure you want to ditch the passcode, here’s the drill:
- Settings HQ: Dive into your iPhone’s control center, otherwise known as Settings.
- Face ID or Touch ID: Depending on your iPhone model, tap Face ID & Passcode or Touch ID & Passcode. It’s like choosing your fighter in a digital duel.
- Passcode Farewell: Tap Turn Passcode Off. But remember, with this decision, you’re basically throwing open the gates to your iPhone kingdom. Make sure you’re comfortable being that welcoming host!
Remember, disabling your passcode is like leaving your front door unlocked. It might be convenient, but it also comes with risks. So weigh the pros and cons carefully before hitting that “Turn Passcode Off” button. And hey, if you ever have a change of heart, you can always re-enable your passcode by following the same steps. Just think of it as giving your iPhone a security makeover whenever you need it!
Reset the passcode
Ever have that moment where you stare at your phone, mind blank, as you type in the wrong passcode for the fifth time? Yeah, we’ve all been there. But before your iPhone throws a digital tantrum and locks you out completely (cue dramatic music), here’s the deal:
Six wrong guesses, and your phone becomes a fancy paperweight. You’ll even get a message saying “iPhone is disabled,” just to rub it in (harsh, Apple, harsh). Turn on the iPhone’s new thief-blocking security features.
Forgot your passcode? Don’t panic! You have two options, neither involving telepathy (sorry, sci-fi fans).
- The computer caper: Connect your iPhone to your computer and use recovery mode to erase it and start fresh. Think of it as a digital factory reset, but with the added bonus of setting a new passcode (hopefully one you’ll remember this time!).
- The backup brigade: If you’re a backup champion and have an iCloud or computer backup from before the amnesia hit, you can restore your data and settings like magic. It’s like finding a forgotten treasure chest filled with all your precious phone stuff.
Remember: Passcodes are your phone’s security shields. Treat them well, and they’ll keep your data safe. But even if you forget, there’s always a way back in. Just be prepared for a little digital adventure (and maybe a minor ego bruise). Turn on the iPhone’s new thief-blocking security features.
Read Also: Which is the Top Best 7 iPhone Apps for Video Downloading 2023
Conclusion
So, friends, in our post today, you have learned how to set a security lock on an iPhone. Today in this post, you have learned thoroughly all the topics related to this. In this post, you will learn all these things: how can you set a passcode on an iPhone?, how can you set or change the passcode?And how can you change it when the iPhone automatically locks?How can you erase data after 10 failed passcodes?, How can you turn on and set up an iPhone? How can you prepare for the setup? How can you turn on and set up your iPhone? How can you turn off the passcode? How can you reset the passcode? Turn on the iPhone’s new thief-blocking security features. We told you today. I gave all the information about all these. If you liked our post, then you can share it with your friends. Have a nice day.
FAQ
Q.1: How do I turn on stolen device protection on an iPhone?
Enabling Stolen Device Protection on your iPhone is a wise step to take for its security. Here’s how you can do it:
Prerequisites:
- Two-factor authentication: Ensure you have two-factor authentication enabled for your Apple ID. This adds an extra layer of security when signing in to your Apple account.
- Passcode, Face ID or Touch ID: Set up a strong passcode and enable Face ID or Touch ID for your iPhone’s lock screen.
- Find My: Activate the Find My app on your iPhone. This allows you to locate your device remotely if it gets lost or stolen.
- Significant Locations (Optional): Enabling Significant Locations under Location Services helps Find My better understand your frequent places, which can be useful in locating your device. You can find this option in Settings > Privacy & Security > Location Services > System Services > Significant Locations.
Steps to enable stolen device protection:
- Open Settings on your iPhone.
- Tap on Face ID & Passcode (for iPhones with Face ID) or Touch ID & Passcode (for iPhones with Touch ID).
- Enter your device passcode when prompted.
- Scroll down and locate the Stolen Device Protection section.
- Tap the toggle next to Stolen Device Protection to turn it on.
Additional Notes:
- If you don’t see the Stolen Device Protection section, you might need to set up Face ID or Touch ID first.
- Once enabled, Stolen Device Protection automatically activates Lost Mode if your iPhone is marked as lost in the Find My app. This disables Apple Pay, displays a custom message on the lock screen, and allows you to track your device’s location.
- Remember to keep your device’s software updated to benefit from the latest security improvements.
I hope this helps! Feel free to ask if you have any other questions. Turn on the iPhone’s new thief-blocking security features.
Q.2: How do I enable Apple’s new security feature?
Step 1: Update Party!
First things first, we need to get your phone squeaky clean with the latest iOS 17.3 update. Think of it like giving your phone a superhero suit—the bad guys won’t stand a chance against its dazzling security features.
Step 2: Double the Trouble, Double the Fun (Security!)
Next, let’s enable two-factor authentication for your Apple ID. Imagine having a super secret handshake with Apple before they let you into your account. Extra layer of security? You bet! Don’t forget to set up a strong passcode and Face ID/Touch ID too. You wouldn’t want just any raccoon unlocking your phone, would you?
Step 3: Settings Safari—I mean, Settings Adventure!
Open the Settings app (don’t worry, it’s not as scary as it sounds) and scroll down until you find Face ID and Passcode (or Touch ID and Passcode, depending on your iPhone model). It’s like finding the hidden treasure map to security island! ️
Step 4: Unlock the Vault (with your password, of course!)
Enter your device passcode (remember, not your secret handshake with the barista). Now, find the Stolen Device Protection section and tap the magic “Turn On Protection” button. Poof! Your phone is now guarded by a dragon—well, not literally, but pretty darn close. Turn on the iPhone’s new thief-blocking security features.
Remember, this is just the beginning of your security journey! Keep your software updated, be cautious about what you click, and maybe avoid letting raccoons use your phone. They might be adorable, but they’re not exactly known for their cybersecurity skills.
I hope this helps! Now go forth and conquer the digital world, brave adventurer! (And maybe keep an eye out for those mischievous raccoons.) ️♀️
Q.3: How do I turn on my new iPhone security?
Step 1: Update Time!
Imagine your phone as a knight; it needs its shining armor! Download the latest iOS 17.3 update. Think of it as a magical potion that grants super-security skills.
Step 2: Double the shields, double the fun!
Next, we add an extra layer of protection with two-factor authentication for your Apple ID. It’s like having a secret codeword only you and Apple know. Don’t forget to set up a strong passcode and face ID or touch ID. A true knight wouldn’t let just any dragon unlock their phone, right?
Step 3: Enter the Security Chamber!
Open the Settings app (no need to fear, it’s friendly). Scroll down like a seasoned explorer until you find Face ID and Passcode (or Touch ID and Passcode for older models). This is the gateway to your phone’s security vault!
Step 4: Unlock the Force Field! (With your password)
Enter your device passcode (remember, not the secret handshake with the barista). Now, find the Stolen Device Protection section and tap the magical “Turn On Protection” button. Boom! Your phone is now guarded by a digital force field, repelling even the most cunning digital villains.
Remember, young Padawan: security is an ongoing journey. Keep your software updated, be cautious about what links you click, and maybe avoid letting mischievous squirrels borrow your phone. They might be cute, but their hacking skills are, well, let’s just say, subpar.
With these steps, your iPhone is now a security fortress! Go forth and conquer the digital world, hero! But remember, even the bravest heroes need a good night’s sleep, so don’t forget to charge your phone too!
Q.4: Does the iPhone have theft protection?
Think your iPhone is invincible? Think again! While it has built-in defenses like Find My (your phone’s personal bloodhound) and Activation Lock (like a digital Fort Knox), they’re not foolproof. Here’s the lowdown:
The Good Guys:
- Find My: This superhero locates your lost phone, blasts an earsplitting alarm, and even erases everything if needed. But remember, it’s not a psychic detective—no internet, no location magic.
- Activation Lock: This is like gluing your phone shut. Wipe it without your Apple ID password, and it’s a useless brick (not a very fun game).
- Passcode, Face ID, or Touch ID: Think of these as your phone’s bouncers, stopping any random stranger from waltzing in.
- Stolen Device Protection (iOS 17.3+): This new sheriff in town tightens security when your phone goes missing, making sure sensitive stuff stays under lock and key (think passcode for extra-important actions).
The Not-So-Good News:
- These features can’t physically stop a snatch-and-grab or track your phone when it’s offline (like a phone in a Faraday cage, fancy, huh?).
- If you’re too slow and the thief disables Find My before you wipe it, your data might be, well, toast.
- Stolen Device Protection only kicks in after you mark your phone as lost, so be quick on the draw!
Bonus Security Options:
- AppleCare+ with Theft and Loss: This is like having a superhero sidekick for your phone, covering both accidental damage and theft (although it does come with a deductible, like any good sidekick).
- Third-party tracking apps: Think of these as extra security cameras, offering fancy features like theft alerts and virtual fences.
Remember:
- Be a phone ninja! Keep an eye on your device, and don’t leave it out in the open like a tempting target.
- Update regularly! New updates are like security patches for your phone’s armor.
- Back up your data! This way, even if your phone gets Thanos-snapped, your precious memories are safe.
By knowing your options and limitations, you can create a fortress fit for your digital kingdom! Just remember, even the best security can’t stop a determined squirrel with a peanut-powered jetpack (but hey, at least you’ll have a hilarious story to tell).